Transitions define how and when a State Machine moves between states. They can use Conditions to determine when a transition occurs and Actions to perform behavior during the transition.Documentation Index
Fetch the complete documentation index at: https://rive-transition-statesmint.mintlify.app/llms.txt
Use this file to discover all available pages before exploring further.
Creating a new Transition
To create a transition, place your mouse near the state you want to leave until you notice the ellipse appear. Click and drag the ellipse to the state you want to transition to. Once you’ve connected two states, you’ll notice an ellipse with an arrow icon indicating the transition’s direction.Configuring a Transition
Once you’ve added a transition, selecting the direction indicator will allow you to configure the transition. There are three different sections to the transition panel, the transition properties, conditions, and interpolation.Transition properties
The transition properties allow you to customize how a transition occurs.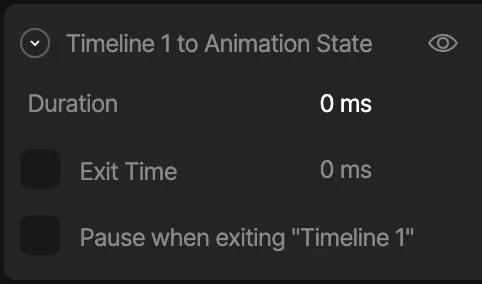
Duration
The duration property describes how long it takes for a transition to occur. The duration is set to zero by default, meaning the transition happens immediately. So, when we transition between these two animations, it appears as though the object snaps from one side of the artboard to the other.Exit Time
Exit Time tells the state machine how much of the state must play before transitioning. By default, Exit Time is unchecked. If you want to enable the Exit Time, use the check box. Once the setting is enabled, you can use either a time value or percent.Pause when exiting
The Pause When Exiting option pauses the animation you are leaving from during the transition.Conditions
Conditions are the rules for our transitions. Without conditions, our transitions would continuously fire and our state machine would likely look either glitchy, or only play a single animation. Conditions require us to define some inputs, which you can read more about here.
Adding a new condition
To add a new condition to a transition, hit the plus button next to the Conditions section.Configuring a Boolean
When you configure a boolean, you can decide if the transition happens when said boolean is either true or false.Configuring a Number
When you configure a number input, you can tell the transition to happen when a numerical condition happens such as equalling a specific number, being greater than or less than a specific number.Configuring a Trigger
When you add a trigger input to a transition, you are telling the transition to fire when that trigger occurs.Custom Transitions
Transition Condition Scripts let you define custom conditions when built-in comparisons aren’t enough—such as transitions that depend on complex logic or multiple view model properties evaluated together.Actions
Transitions can also perform actions when the transition occurs. Unlike conditions, which determine whether a transition can happen, actions perform an operation when the transition is triggered. Actions can be used to:- Set property values
- Report events
- Align targets
- Control focus
- Fire a scripted action
Actions can also be fired at the start or end of a state.See State Actions.
Action Timing
Each action can run at either:- Start — Runs when the transition begins
- End — Runs after the transition completes
Creating an Action
Add an action
With a transition selected, go to the Actions tab, click the
+ button, and select an action type.Interpolation
You can add interpolation to your transition at the bottom of the Transitions Panel. By default, the interpolation is set to linear, but you can use the cubic and hold interpolations. Note that the interpolation between states is most effective when your transition duration is longer. If you are unfamiliar with the basics of Interpolation, read more Interpolation (Easing).Disabling a Transition
You can temporarily disable a transition without deleting it. A disabled transition is ignored by the state machine — its conditions will not be evaluated and it will not fire — until you re-enable it. There are two ways to toggle a transition’s enabled state:- From the transition panel: select the transition and click the enable/disable icon in the panel.
- From the canvas: right-click the transition and choose Disable transition (or Enable transition if it’s already disabled).